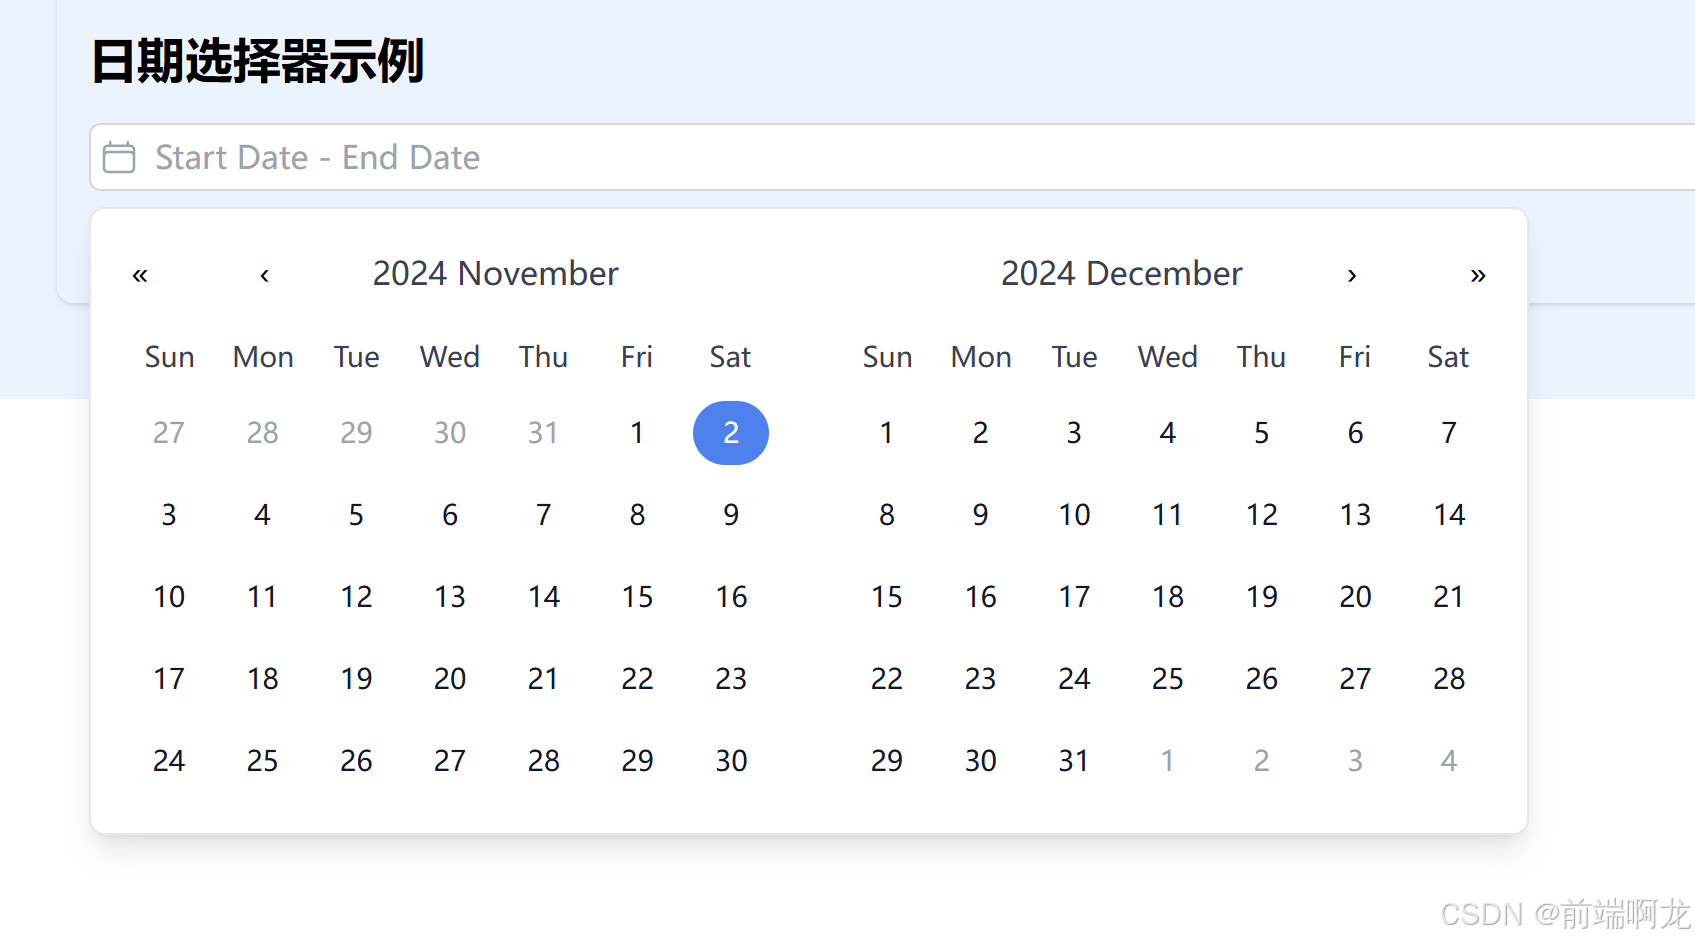
先看效果:

关注我,带你造轮子
废话少说,直接上代码:
Calendar.vue
javascript"><template>
    <div class="calendar">
        <div class="grid grid-cols-7 mb-2">
            <div v-for="day in weekDays" :key="day" class="text-center text-sm text-gray-700">
                {{ day }}
            </div>
        </div>
        <div class="grid grid-cols-7 gap-px">
            <div v-for="{ date, isCurrentMonth, isInRange, isStart, isEnd } in calendarDays"
                :key="date.format('YYYY-MM-DD')" class="relative p-1"
                @click="isCurrentMonth && $emit('selectDate', date)"
                @mouseenter="isCurrentMonth && $emit('hoverDate', date)">
                <button type="button" :class="[
                    'w-full h-8 text-sm leading-8 rounded-full',
                    isCurrentMonth ? 'text-gray-900' : 'text-gray-400',
                    {
                        'bg-blue-500 text-white': isStart || isEnd,
                        'bg-blue-50': isInRange,
                        'hover:bg-gray-100': isCurrentMonth && !isStart && !isEnd && !isInRange
                    }
                ]" :disabled="!isCurrentMonth">
                    {{ date.date() }}
                </button>
            </div>
        </div>
    </div>
</template>

<script setup>
import { computed } from 'vue'
import dayjs from 'dayjs'

const props = defineProps({
    currentDate: {
        type: Object,
        required: true
    },
    selectedStart: Object,
    selectedEnd: Object,
    hoverDate: Object
})

const emit = defineEmits(['selectDate', 'hoverDate'])

const weekDays = ['Sun', 'Mon', 'Tue', 'Wed', 'Thu', 'Fri', 'Sat']

const calendarDays = computed(() => {
    const firstDay = props.currentDate.startOf('month')
    const lastDay = props.currentDate.endOf('month')
    const startDay = firstDay.startOf('week')
    const endDay = lastDay.endOf('week')

    const days = []
    let day = startDay

    while (day.isBefore(endDay) || day.isSame(endDay, 'day')) {
        days.push({
            date: day,
            isCurrentMonth: day.month() === props.currentDate.month(),
            isInRange: isInRange(day),
            isStart: isStart(day),
            isEnd: isEnd(day)
        })
        day = day.add(1, 'day')
    }

    return days
})

const isInRange = (date) => {
    if (!props.selectedStart || !props.hoverDate) return false
    const end = props.selectedEnd || props.hoverDate
    return date.isAfter(props.selectedStart) && date.isBefore(end)
}

const isStart = (date) => {
    return props.selectedStart && date.isSame(props.selectedStart, 'day')
}

const isEnd = (date) => {
    if (props.selectedEnd) {
        return date.isSame(props.selectedEnd, 'day')
    }
    return props.hoverDate && date.isSame(props.hoverDate, 'day')
}
</script>
DataPicker.vue
javascript"><template>
    <div class="relative inline-block text-left w-full box-content " ref="container">
        <!-- Input Field -->
        <div @click="togglePicker"
            class="w-full px-1 py-1 text-gray-500 bg-white border border-gray-300 rounded-md cursor-pointer hover:border-blue-500 focus:outline-none">
            <div class="flex items-center align-middle ">
                <CalendarIcon class="w-5 h-5 mr-2 text-gray-400" />
                <span v-if="startDate && endDate" class="flex items-center justify-evenly w-full">
                    <span>
                        {{ formatDate(startDate) }}
                    </span> <span>To</span> <span>
                        {{ formatDate(endDate) }}
                    </span>
                </span>
                <span v-else class="text-gray-400">Start Date - End Date</span>
            </div>
        </div>

        <!-- Calendar Popup -->
        <div v-if="showPicker" ref="popup" :style="popupStyle"
            class="absolute z-50 mt-2 bg-white rounded-lg shadow-lg p-4 border border-gray-200" style="width: 720px">
            <div class="flex space-x-8">
                <!-- Left Calendar -->
                <div class="flex-1">
                    <div class="flex items-center justify-between mb-4">
                        <button class="p-1 hover:bg-gray-100 rounded-full" @click="navigateMonth('left', -12)">
                            «
                        </button>
                        <button class="p-1 hover:bg-gray-100 rounded-full" @click="navigateMonth('left', -1)">
                            ‹
                        </button>
                        <span class="text-gray-700">
                            {{ formatMonthYear(leftMonth) }}
                        </span>
                        <div class="w-8"></div>
                    </div>
                    <Calendar :current-date="leftMonth" :selected-start="startDate" :selected-end="endDate"
                        :hover-date="hoverDate" @select-date="handleDateSelect" @hover-date="handleHoverDate" />
                </div>

                <!-- Right Calendar -->
                <div class="flex-1">
                    <div class="flex items-center justify-between mb-4">
                        <div class="w-8"></div>
                        <span class="text-gray-700">
                            {{ formatMonthYear(rightMonth) }}
                        </span>
                        <button class="p-1 hover:bg-gray-100 rounded-full" @click="navigateMonth('right', 1)">
                            ›
                        </button>
                        <button class="p-1 hover:bg-gray-100 rounded-full" @click="navigateMonth('right', 12)">
                            »
                        </button>
                    </div>
                    <Calendar :current-date="rightMonth" :selected-start="startDate" :selected-end="endDate"
                        :hover-date="hoverDate" @select-date="handleDateSelect" @hover-date="handleHoverDate" />
                </div>
            </div>
        </div>
    </div>
</template>

<script setup>
import { ref, computed, onMounted, onUnmounted, nextTick } from 'vue'
import dayjs from 'dayjs'
import { CalendarIcon } from '@heroicons/vue/24/outline'
import Calendar from './Calendar.vue'

// Props and emits
const props = defineProps({
    modelValue: {
        type: Array,
        default: () => [null, null]
    }
})

const emit = defineEmits(['update:modelValue'])

// State
const showPicker = ref(false)
const leftMonth = ref(dayjs())
const hoverDate = ref(null)
const startDate = ref(null)
const endDate = ref(null)
const container = ref(null)
const popup = ref(null)
const popupStyle = ref({})

// Computed
const rightMonth = computed(() => {
    return leftMonth.value.add(1, 'month')
})

// Methods
const formatDate = (date) => {
    if (!date) return ''
    return date.format('YYYY-MM-DD')
}

const formatMonthYear = (date) => {
    return date.format('YYYY MMMM')
}

const navigateMonth = (calendar, amount) => {
    leftMonth.value = leftMonth.value.add(amount, 'month')
}

const handleDateSelect = (date) => {
    if (!startDate.value || (startDate.value && endDate.value)) {
        startDate.value = date
        endDate.value = null
    } else {
        if (date.isBefore(startDate.value)) {
            endDate.value = startDate.value
            startDate.value = date
        } else {
            endDate.value = date
        }
        emit('update:modelValue', [formatDate(startDate.value), formatDate(endDate.value)])
        showPicker.value = false
    }
}

const handleHoverDate = (date) => {
    hoverDate.value = date
}

const handleClickOutside = (event) => {
    if (container.value && !container.value.contains(event.target)) {
        showPicker.value = false
    }
}

const togglePicker = () => {
    showPicker.value = !showPicker.value
    if (showPicker.value) {
        nextTick(() => {
            updatePopupPosition()
        })
    }
}

const updatePopupPosition = () => {
    if (!container.value || !popup.value) return

    const containerRect = container.value.getBoundingClientRect()
    const popupRect = popup.value.getBoundingClientRect()

    const viewportHeight = window.innerHeight
    const spaceAbove = containerRect.top
    const spaceBelow = viewportHeight - containerRect.bottom

    let top = '100%'
    let bottom = 'auto'
    let transformOrigin = 'top'

    if (spaceBelow < popupRect.height && spaceAbove > spaceBelow) {
        top = 'auto'
        bottom = '100%'
        transformOrigin = 'bottom'
    }

    let left = '0'
    const rightOverflow = containerRect.left + popupRect.width - window.innerWidth
    if (rightOverflow > 0) {
        left = `-${rightOverflow}px`
    }

    popupStyle.value = {
        top,
        bottom,
        left,
        transformOrigin,
    }
}

// Lifecycle
onMounted(() => {
    document.addEventListener('click', handleClickOutside)
    window.addEventListener('resize', updatePopupPosition)
    window.addEventListener('scroll', updatePopupPosition)

    if (props.modelValue[0] && props.modelValue[1]) {
        startDate.value = dayjs(props.modelValue[0])
        endDate.value = dayjs(props.modelValue[1])
        leftMonth.value = startDate.value
    }
})

onUnmounted(() => {
    document.removeEventListener('click', handleClickOutside)
    window.removeEventListener('resize', updatePopupPosition)
    window.removeEventListener('scroll', updatePopupPosition)
})
</script>
app.vue
javascript"><template>
    <div class="p-4">
        <h1 class="text-2xl font-bold mb-4">日期选择器示例</h1>
        <DatePicker v-model="selectedDate" format="YYYY年MM月DD日" />
        <p class="mt-4">选择的日期: {{ selectedDate }}</p>
    </div>
</template>

<script setup>
import { ref } from 'vue'
import DatePicker from '@/components/DatePicker/DataPicker.vue'

const selectedDate = ref(['', ''])
</script>
最后注意安装dayjs和@heroicons/vue这两个工具库


